Manage your Team
Each app/project can have its own unique permission settings and roles. Different teams and individuals can be given or denied access or permissions to specific apps/projects.
Review Team Settings
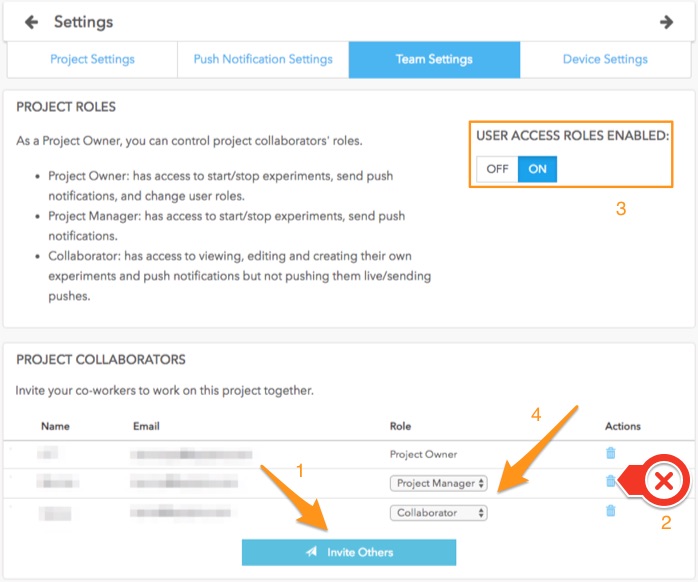
In Settings > Team Settings, you can:
- Invite team members to your project (1)
- Delete team members from your project (2)
- Enable/Disable user access roles, i.e. user permissions (3)
- Change team members' role (4)

Roles & Permissions
For small teams, we suggest keeping permissions turned off. This will ensure a maximum amount of flexibility and low procedural overhead. Permissions limit what certain users can do, and on small teams, proper training on all aspects of the platform is relatively easy.
For larger teams that require more structure it is suggested that permissions be leveraged.
There are 3 key roles:
- A Project Owner has full access to the Taplytics Dashboard functionalities. He/She has 100% control of their own experiments, pushes, and feature flag tests, as well as the ones created by others. He/She also has control over all of the above mentioned team management actions.
- A Project Manager has the same permissions as the Project Owner except that he/she cannot define or adjust roles or permissions for the project.
- A Collaborator can create and edit his/her own experiments, pushes, and feature flag tests but can not publish them live. He/She can only view live experiments, pushes, and feature flag tests but can not edit, pause, stop, or delete. He/She also can not action anything on the Team Settings section.
Please note that they can be multiple Project Owners for the same app/project but a Project Owner can not assign a user to this role. Please contact [email protected] if you need to change a user's role to Project Owner.
For more information, check out our Account Structure article.
Updated over 6 years ago
