How to QA Experiments
If you're at this point in the documentation, you should have already created your first experiment, whether it's code-based or visual. If you haven't, you've probably gone too far and should look a few steps back.
QA isn't just about seeing your visual changes or new features on a device before sending them out. It is also about testing your goals and understanding how Taplytics is going to distribute your experiment to your users. You'll want to know that everything will be tracked and distributed accurately if you've taken the time to set up your goals and a target segment.
Previewing your experiments
Let's not re-hash how to see real-time changes occurring on your device. That's been covered in Pair & Manage your Devices and creating Visual Experiments. Previewing your app edits is all about getting other people on your team, who may not have access to Taplytics, to check out your experiments and make sure they look and behave the way you expect.
The Taplytics Shake Menu
The first step to achieving team-based QA is to make sure all of the people who will preview your tests have their devices connected to Taplytics. Again, to get this set up properly, visit the documentation on Pair your Devices. This will provide a step-by-step guide to get your team's devices connected to your account.
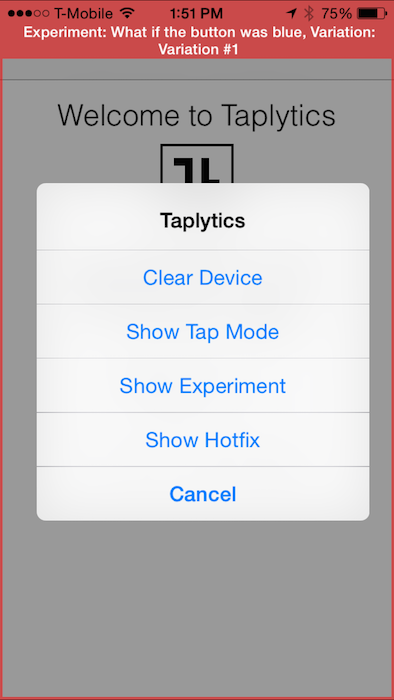
Once the right people have their devices connected, all you have to do is tell them to open the app and shake their phone to see your experiment. That's right, get them to shake their phones. Once your QA team has shaken their phones (provided that their phone has been connected and accepted as a connected device for Taplytics), the Taplytics menu will display.
The Taplytics Shake Menu provides anyone with access to it with the ability to view all of your draft and active experiments on any device, regardless of whether the app is loaded on a physical device or a virtual XCode simulator.

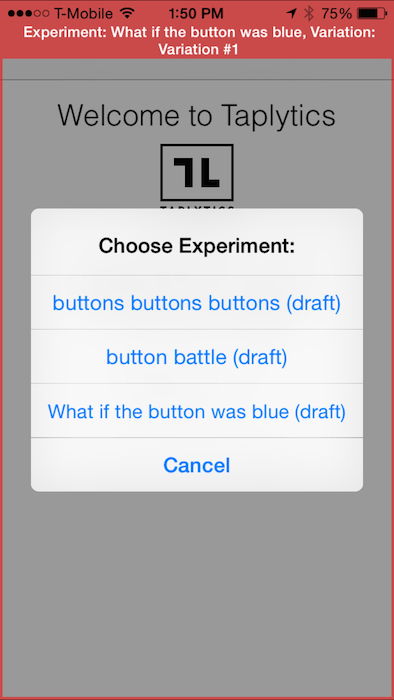
To preview an experiment, all a team member has to do is tap the “Show Experiment” option in the Taplytics menu and they will be brought to a list of draft and active experiments. Once they pick the desired experiment, they can preview any of the variations that you have created.

The great thing here is that this means that your QA is done on actual devices. Any of your variations are displayed exactly as your users would see them in the wild. Totally awesome.
Force Users into Experiments/Variations
For non-paired devices, you can preview experiments and variations by forcing selected users into it using Taplytics Experiments/Variations switcher in "User Insights".
Important note: Once a user has been forced into an experiment and a variation, he/she will no longer receive that experiment "naturally" as the experiment distribution logic sticks at device level. Read about it in this article. Even after a winning variation is set or an experiment is archived, the device will continue to receive the forced experiment/variation and will have to be manually removed from it if wanted.
QA URLs
Use QA URLs to preview a Variation within an Experiment, or a Feature Flag. QA URLs allow users to very easily place a spotlight on a particular web experience with minimal button clicks; this is perfect for very quickly handing off a new experience to a user without having to use the Taplytics dashboard.
Using QA URLs is very simple; all you need is the following:
-
The URL to your website with the Taplytics JS SDK installed
-
The Experiment Id and Variation Id created by Taplytics
You can get your Experiment or Feature Flag QA URL easily by Copying a Share Link directly from the Visual Web Editor. Alternatively, if you know your Experiment and Feature Flag IDs, you can append those as query parameters to any URL on your site. We'll show you how to grab those below.
Copy Share Link
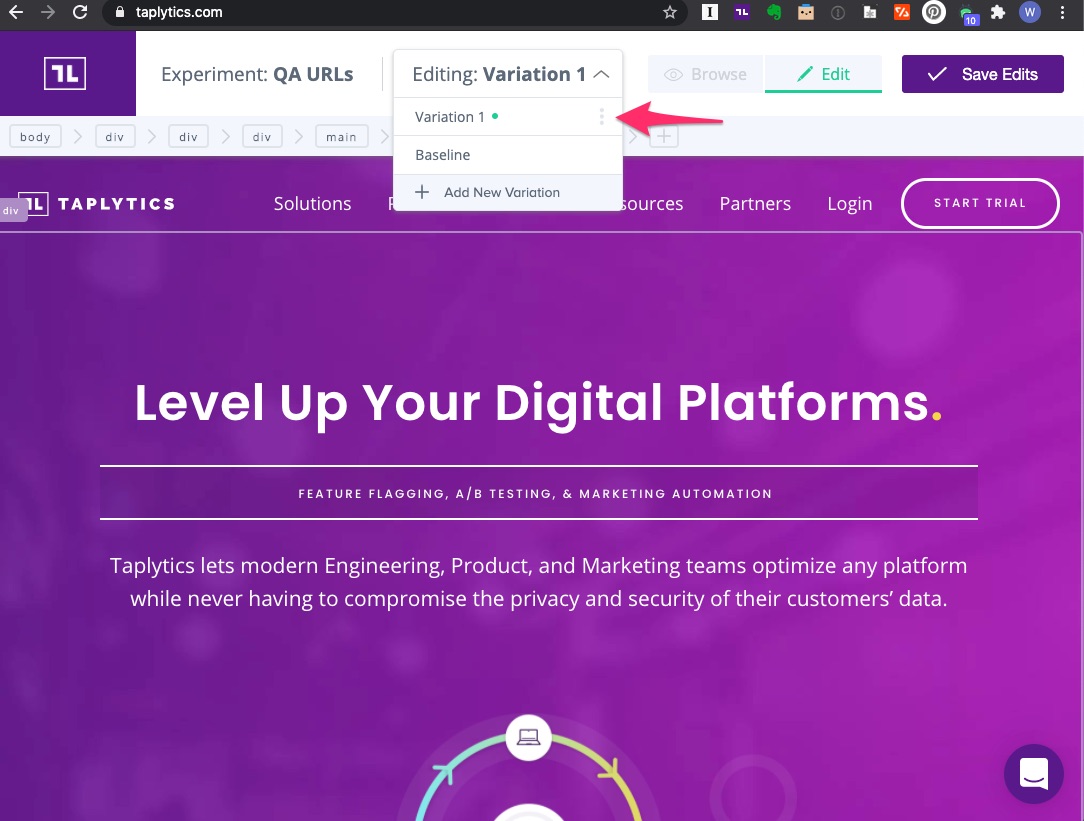
- Open up the Visual Web Editor to the desired page that you'll want to share. In the Taplytics header, click on the dropdown to open up the Variations list.

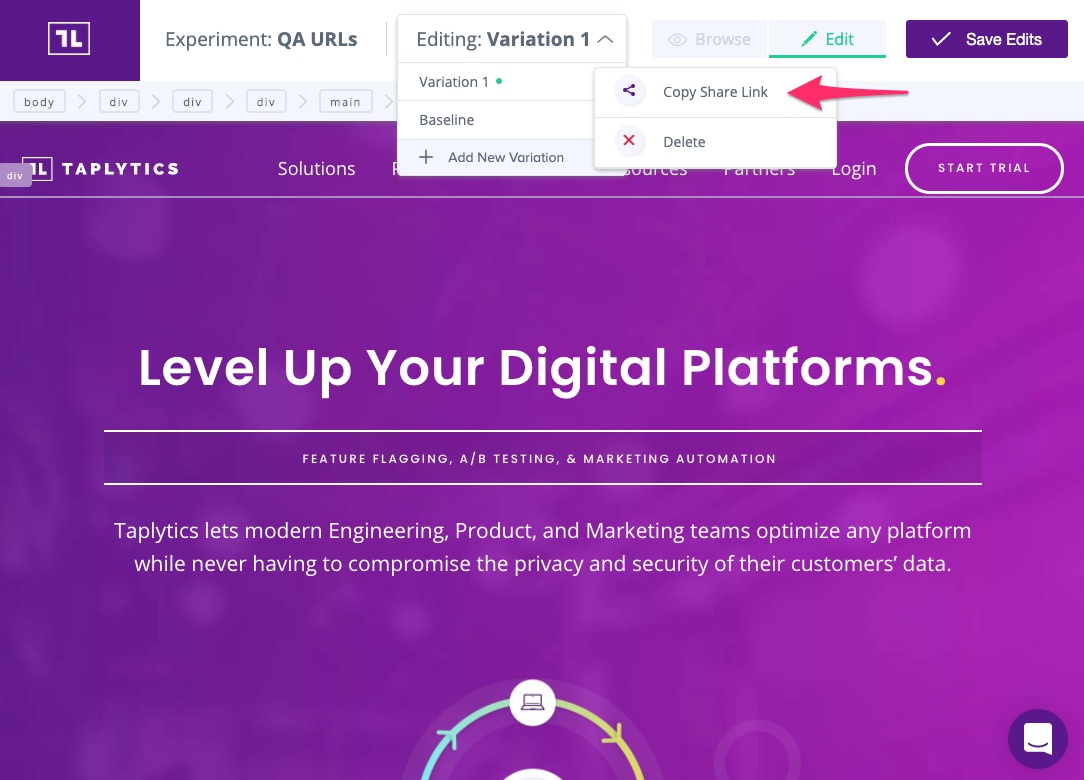
- Click on options (three dots) and click on Copy Share Link

- That's it! Once you copy your link, you can send it to your teammate who will be able to view the web visual editor changes made on that particular Variation.
Viewing the baseline of an experiment
To view the baseline of your experiment, simply update the URL from &variation={variation_id} to &variation=baseline.
Note
If your teammate is in incognito mode and the expected change doesn't show up, they may have to disable reduced referrer granularity by navigating to chrome://flags/#reduced-referrer-granularity in your browser as shown below.

Build your own QA URL
The Copy Share Link method provides an easy method to grab the Experiment and Variation IDs at first. After you've grabbed those links, you can append the same Experiment and Variations IDs to any page on your site.
The format of the URL should be the following:
https://yourdomain.com/subpage?experiment=[experiment_id]&variation=[variation_id]
or
https://yourdomain.com/subpage?experiment=[feature_flag_id]&variation=baseline
Your Experiment or Feature Flag ID can be found in the URL of the Taplytics dashboard. Simply navigate to your Experiment or Feature Flag and grab the correct id from the URL.
https://taplytics.com/dashboard/[projectId]/experiments/[experimentId]/
or
https://taplytics.com/dashboard/[projectId]/featureFlags/[featureflagId]/
The Variation ID of the experience you are trying to test can be grabbed via our Rest API but we suggest using the Copy Share Link feature to easily grab those instead. Note that the Variation ID of a Feature Flag is just baseline.
Notes
- This feature is only available to sites that leverage https. We recommend a tool along the lines of ngrok to grab an https URL when running locally.
- Ensure that "Reduce default referrer header granularity" is disabled in Chrome: chrome://flags/#reduced-referrer-granularity

Add Test Experiments in your Start Options
Developers are able to explicitly test Active and Draft experiments, along with their variations, using the testExperiments functions in the Taplytics SDKs. More information can be found in the links below:
Test your Goals
Once your team views the desired experiment or variation, test out the goals you set up and make sure everything is tracked correctly. To do this, push your experiment live just for people with an internal build of your app and track the data coming into your experiment's results page. This also works for testing distribution. Testing your goals internally can provide you with a sense of what the real data will look like.
If you're a developer and you want to make sure that the code goals that you instrumented are firing properly and you don't want to wait for these charts to populate, look no further than our User Insights platform. Our User Insights show you everything that a user does in your app and shows you when an experiment is run and when a code goal or event is triggered. To test that your code events are working in under a minute, open the app, shake your device, run the appropriate experiment, and fire those events. Once you refresh the "User Insights" page, you will see your device at the top. When you go into the detailed view, you will see everything you did in that session, including which events occurred and the values that were passed to your results.

Test your Distribution
So your experiment is looking gorgeous, your goals are firing like champs, and now you want to make sure the right people get your experiment.
If you really want to make sure that distribution is working as you'd expect, set the app version in target segmentation to an internal build and hit "Run Experiment".
Your team doesn't need to go to the shake menu; they just need to re-open the app after you've hit run. You can check the "User Insights" view and you'll be able to see who on your team is running which version of your app, and which user attributes received the experiment.
Distribution Percentage
Given that your internal testing team is probably relatively small (under 100 people), if you set your distribution at 50-50, you will not see exactly half of your team get each variation. The distribution is probability-based.
If you have 10 people testing the new experiment even with 50-50, you could get all ten of them seeing the same variation. The best way to test distribution is to set 100% distribution to one variation before hitting the “let's run” button. This way, all devices are sent one variation and you'll know it's working. If it's not, you'll know that the first place you should check is the "DelayLoad" feature in our SDK to make sure Taplytics is giving your experiments the appropriate amount of time to load properly.
Automated Testing
Our suggested process for automated testing is below. Here, we use Selenium as an example.
- Ensure that the engineer creating the Selenium script knows what the changes in the variations are.
- From there, they would create separate scripts to ensure what was changed in both A/B is captured.
- The easiest thing would be to check the difference in Selenium for the variants for unique differences. You would know what is unique in each variation (ie. XPath or element).
- Use an if statement to check for that unique XPath or element and run the appropriate Selenium script.
Updated about 3 years ago
